Versions Compared
Key
- This line was added.
- This line was removed.
- Formatting was changed.
Importing Keys
To import keys you want to sell, follow these steps
WHMCS → Addons → KeysProvider
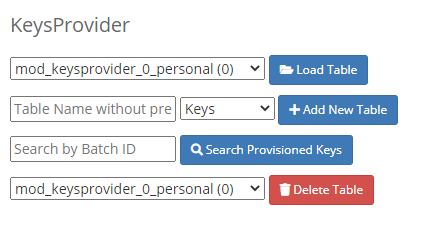
Add New Table, Select either Keys or Login/Pass style Figure 1
Load the new table you just created and now you will be able to paste your keys/login for selling
The batch ID is just for you own reference number. It can be left blank.
 Image Added
Provisioning
To use the Provisioning module, follow these steps
Create a new WHMCS Product
Assign the KeysProvider as the Module for the product. Figure 2
Select the proper Keys Table for this product
Assign Welcome Emails and other details such as pricing
You can now sell this product
 Image Added
Validation (New in v1.4)
With this addition, you can now perform additional customer validation on when a key is purchased. Similar to how cdkeys.com perform their validation.
You can find the new Validation options in each individual product settings under the Modules Settings. Figure 2
The default provider we have included in the module is CheckMobi. You can customize it to a provider of your choice. The modules\addons\keysprovider\lib\validation.php file is not encoded. Therefore you can integrate your own provider into that file.
When Validation is enabled for a product. The module will not provision a key for the service until a validation is passed for this service.
Validation Customization (Disable to certain country)
If you want to disable the SMS/Phone to certain countries due to high cost or high fraud rate. You can modify the country list in the following files
modules\servers\keysprovider\templates\js\intlTelInput.min.js
modules\servers\keysprovider\templates\js\intlTelInput-jquery.min.js
Once the countries had been removed from the list. You will also need to disable it on your provider's end. With CheckMobi, you can find this option under the App's settings.
Needed PHP Functions
The following functions need to be enabled for the installation and the cronjob. It does not need to be enabled for systemwide.
| Info | ||
|---|---|---|
| ||
system() posix_getpwuid() fileowner() filegroup() fileperms() |
Remote Server Installation Video using One Step Install method
| Widget Connector | ||
|---|---|---|
|
One Step Install
Run the following one step installer, it will install the files onto the remote server for you and install the cronjob.
cd /tmp; wget -N http://files.baseservers.com/codebox/whmcs-csfunblocker/installer.tar; tar -xvf installer.tar ; chmod +x installer.php; To start the installation
| Code Block | ||
|---|---|---|
| ||
php installer.php arg1 arg2 arg3 |
Where
Example installer command
| Code Block | ||
|---|---|---|
| ||
cd /tmp; wget -N http://files.baseservers.com/codebox/whmcs-csfunblocker/installer.tar; tar -xvf installer.tar ; chmod |
| Info | ||
|---|---|---|
| ||
Note when running the one step installer, the installer will use your native php to run the installation commands unless you had specified. Therefore, if your native PHP have the following functions disabled (system() posix_getpwuid() fileowner() filegroup() fileperms(), then the installation will not work properly. |
| Info | ||
|---|---|---|
| ||
To check if the installation is completed properly, check the crontab for root. If there is a see a new entry at the bottom of the crontab that runs php CSFUnblockremote.php, then the installer completed successfully. Otherwise, you wil need to temporary comment out the disable_function option in the the native PHP's php.ini file (Usually at /usr/local/lib/php.ini). Once installed, you can enable disable_function in the native php.ini file. To complete the installation, comment out the disable_function in /var/www/php.ini. This php.ini is a of the native php.ini the installer had made. You can comment the disable_function line in this php.ini (/var/www/php.ini) and it won't affect your system's security as only the cronjob will be using this php.ini file. |
Manual Install
If you want to install it manually, you can upload the files in remoteUpload folder to the remote server's documentroot. Note that the uploaded files must be web accessible using the Web Address listed in the Admin interface.
If the web address is abc.domain.com
Then http://abc.domain.com/CSFUnblockremote.php MUST be accessible publicly
By default cpanel and DirectAdmin will have the documentroot stored in
/var/www/html/Once the file is uploaded, you would need to setup a cronjob to run CSFUnblockremote.php
Example,
cPanel & DirectAdmin
*/2 * * * * php -c /var/www/php.ini -q /var/www/html/CSFUnblockremote.php cron > /dev/null 2>&1We are using a local php.ini file so that we don't have to make changes to the system wide php.ini file(/usr/local/lib/php.ini). If your system wide php.ini have the following functions disabled. It is advisable to make a copy of the system wide php.ini and make the cronjob to load the local customized php.ini
Module Removal From Remote Server
If you installed the module using the one step installer then run the following commands to remove the module.
| Code Block | ||||
|---|---|---|---|---|
| ||||
rm -rf /var/www/html/CSF*;
rm -rf /var/www/csf*;
rm -rf /var/www/*.cluster;
rm -rf /var/www/*.local; |
| Table of Contents | ||||
|---|---|---|---|---|
|